3CX SSL certificates: How to Manage with Certbot’s DNS plugin
In today’s blog post, we will discuss how to manage 3CX certificates. Specifically, we’ll explore how IT managed services providers can use Let’s Encrypt’s free and automated SSL certificates on 3CX servers with custom domain names, even after the release of version 20.
Let’s dive into the process of securing your 3CX VoIP services using automated SSL certificates, all while keeping costs and complexity low.
The Problem with 3CX Certificates
Prior to version 20, 3CX supported free and automated SSL certificates through Let’s Encrypt for both 3cx and custom domain names and provided a straightforward way for businesses to secure their VoIP services. However, in version 20, 3CX made a significant change: they now only support Let’s Encrypt certificates on 3CX servers that use a 3CX domain name (such as 3cx.uk) and not on custom domain names (like sip.domain.com).
As a London-based IT managed services provider, we understand that many of our clients prefer to use their own domain names to access their VoIP services. This, however, presents a challenge; purchasing and configuring SSL certificates annually for custom domain names increases both costs and management time. While this is not a difficult process, we know from experience that it’s far more cost-effective and efficient to automate the process using Let’s Encrypt, especially given that their service is free.
If you’re unfamiliar with Let’s Encrypt, you can read more about their services here.
The Solution: Automated SSL Certificates for 3CX Servers with Custom Domains
Fortunately, there is a solution. In this section, we’ll explain how to use the certbot command-line tool to install, configure, and secure automated SSL certificates on 3CX servers configured to use custom domain names.
Let’s Encrypt requires domain validation before issuing a certificate. In most cases, this validation is done via an HTTP request on port 80. However, challenges can arise if:
- A different process, like Apache or NGINX, is already running on port 80.
- The web server is configured to block requests to the folder that Let’s Encrypt uses for validation.
- Port 80 is unavailable due to policy or misconfiguration.
To solve these issues, we can use certbot’s DNS plugin for validation. This add-on supports several DNS providers, although not all. You can find an up-to-date list of supported providers here.
As an IT managed service provider based in London, we manage DNS for our clients through our preferred provider, Linode. Linode is supported by certbot’s DNS plugin, so for us, the process is simple. However, make sure to check whether your DNS provider is supported before starting.
Step-by-Step Guide to Configuring Certbot for 3CX
1. Access Your 3CX Server
Start by logging into your 3CX server via SSH. We recommend setting up SSH access using private keys for passwordless access, though password-based access is also fine for smaller environments.
2. Install Certbot
3CX removes standard Debian repositories during the initial installation process, so the first step is to edit the sources.list file to include these repositories. Open the file for editing:
pico /etc/apt/sources.listAdd the following lines:
deb http://deb.debian.org/debian/ main contrib non-free
deb http://security.debian.org/debian-security main contrib non-free
Then run the following command to update your system repositories:
apt update3. Install Snap and Certbot
The recommended way to install certbot is via Snap, so install it by running:
apt install snapdAfter installing snapd, edit the sources.list file again to remove the Debian repositories, leaving only the 3CX repositories and run ‘apt update’ again.
4. Ensure Certbot is Installed Correctly
Before installing certbot, check if any previous versions are installed:
apt-get remove certbotInstall certbot using Snap:
snap install --classic certbotCreate a Symbolic Link for Certbot and link certbot to the bin folder for easier future use:
ln -s /snap/bin/certbot /usr/bin/certbot
snap set certbot trust-plugin-with-root=ok
Configuring the Certbot DNS Plugin for Domain Validation
Now that certbot is installed, the next step is to configure the DNS plugin for domain validation. You’ll need to create an API token on your DNS platform to allow certbot to add the required DNS records.
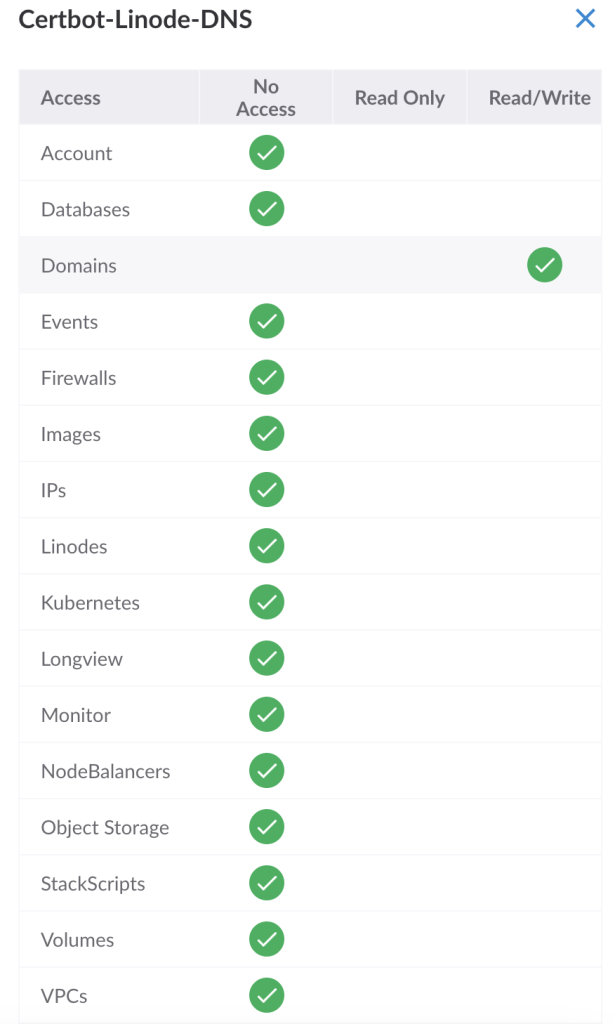
If you’re using Linode (like we do), log into the Linode control panel and create an API token with read/write access to your DNS zones. You can do this by selecting your account icon (top right) and selecting API Tokens. Next, create a new token and select read/write access for domains, as pictured below –
Store this token securely in a password manager.
On your 3CX server, create a credentials file to store the API token, I’m using the working directory of /opt/cert to store the file called linode.ini:
pico /opt/certbot/linode.ini
Add the following:
Linode API credentials used by certbot:
dns_linode_key = <your_api_token>
dns_linode_version = 4
Finally, set secure permissions for this file:
chown root: /opt/certbot/linode.ini
chmod 600 /opt/certbot/linode.ini
Generating the SSL Certificate
With the certbot DNS plugin configured, you can now generate the SSL certificate. Use the following command, replacing the domain name and file path as needed:
certbot certonly \
--dns-linode \
--dns-linode-credentials /opt/certbot/linode.ini \
-d sip.domain.com \
--agree-tos \
--dry-run -v
The –dry-run flag ensures no certificate is generated, allowing you to confirm the process is working. Once confirmed, remove the –dry-run flag and run the command again to generate the actual certificate.
Configuring 3CX to Use the New SSL Certificate
Now, let’s configure 3CX to use the newly generated SSL certificate. 3CX uses NGINX as its web server, so we need to modify the NGINX configuration file to point to the new Let’s Encrypt certificates.
1. Find the NGINX configuration file:
cat /etc/nginx/sites-enabled/3cxpbx
2. Move the original certificates to a backup:
mv sip.domain.com-crt.pem sip.domain.com-crt.pem.bak
mv sip.domain.com-key.pem sip.domain.com-key.pem.bak
3. Link the new Let’s Encrypt certificates:
ln -s /etc/letsencrypt/live/sip.domain.com/fullchain.pem /var/lib/3cxpbx/Bin/nginx/conf/Instance1/sip.domain.com-crt.pem
ln -s /etc/letsencrypt/live/sip.domain.com/privkey.pem /var/lib/3cxpbx/Bin/nginx/conf/Instance1/sip.domain.com-key.pem
4. Reload NGINX:
service nginx reload
5. Finally, open a browser and check that the correct SSL certificate is being used.
Conclusion
By following these steps, IT managed services providers can automate the process of managing SSL certificates for 3CX servers with custom domain names. Using Let’s Encrypt’s free service saves time, reduces costs, and improves overall security. If you have any questions or need assistance with your 3CX setup, feel free to get in touch with us—we’re always here to help with IT managed services in London and the South-East! or check out our other blog posts!