How to create an ESXi usb installer on Mac OS X
A couple of days ago I wanted to test VMware ESXi 5.5 on a Mac Pro 4,1 (quad-core XEON 2.66GHz / 8GB RAM). I had a couple of issues doing this, mostly my fault as, of course, I jumped straight in and didn’t read any of the documentations. Anyway, once I had read the documentation there were still a few things not covered, so I thought I would document the steps I took to get the platform installed:
Download ESXi…
The first step is to download the ESXi software and copy it to the USB key. You can get this from the VMWare website; the UK portal is at https://www.vmware.com/uk.html.
You need a VMWare account in order to download the software, but it’s totally free and only takes a few minutes. Once you have done this you can proceed to download the software – there are a few different options here, but make sure you download the ESXi software which is usually labelled ‘VMWare vSphere Hypervisor (ESXi)’, rather than vCenter, vCenter appliance and so on. The installer files are packaged in a .iso files and the whole image is about 400MB, so is quick to download.
Configuring the USB key…
Get your USB key – as the source files are so small a 512MB or 1GB key is sufficient.
Format the USB key with a Master Boot record partition map and a FAT32 file system. Although you can do this through Terminal and keep your command line ego intact (man diskutil to find out more), the quickest way is to use Disk Utility:

Next, open Terminal, located in the /Applications/Utilities folder.
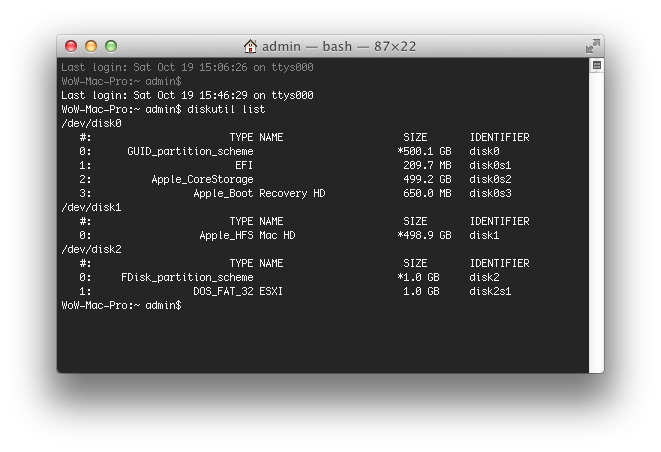
In Terminal, type in ‘diskutil list’ (without quotes) and hit enter to see all of the volumes mounted on your system. Find the system designated name for the USB key – You will know which disk it is by looking at the sizes of all of the volumes and the volume name. Generally, your Macintosh HD will be mounted to /dev/disk0 and if you have your USB plugged in with no other external devices, it should be mounted at /dev/disk1. In my case the USB key is called ‘ESXI’ and has the designation ‘/dev/disk2’, as you can see in the image below:
We’ll now have to use the fdisk command to flag the USB key’s partition as bootable, but to do that you’ll have to first unmount the USB key from the system. In Terminal type ‘diskutil unmount /dev/disk[NUMBER]’ (as above). If the command works you’ll get a Terminal confirmation that the volume has been unmounted.
Next, enter fdisk’s interactive mode and select the desired volume – you can do this in one command with ‘fdisk -e /dev/disk[NUMBER]’
At the fdisk interactive prompt type ‘f 1’ (without quotes) to flag the first partition on the volume as active and bootable.
Follow these commands with ‘write’ and next ‘quit’ to leave fdisk. If at any point you get an error, make sure the volume has been unmounted but not ejected. You can always use the unmount button in Disk Utility. After this is complete, remount the USB key onto the Desktop.
Copying and configuring ESXi…
Close Terminal and mount the ESXI installer .iso. Copy all files from the installer onto the USB Key – you can use Terminal to do this but I simply dragged and dropped through the Finder.
The last step is to modify a file on the USB key to tell the system which partition to use when booting up – on the USB key find the file called ‘ISOLINUX.CFG’, rename it ‘SYSLINUX.CFG’ and open it in any Terminal text editor such as vi or pico or open it in TextEdit (but do not open it in MS Word!).
In the document, find the line that starts ‘APPEND -c boot.cfg’ and add ‘-p 1’ on the end (without the quotes). Save and Close TextEdit.
Now, if all things have been done correctly and successfully you should have a bootable ESXi USB Key! The disk won’t show up as bootable in System Preferences -> Startup Disk but it will work by rebooting the Mac and holding down the Option key (‘alt’ key) to bring up the boot loader.
See this article on setting your Mac to boot from the key persistently.


Worked perfectly for me. Used macOS Sierra 10.12.6 to put Dell edition of ESXi 6.5 on USB stick. Used it to install ESXi on Dell PowerEdge R530.
Thanks for posting this. Instructions I found elsewhere did not work. Much appreciated.
Hi, I have tried this with a macbook pro laptop mid 2014 model. I was able to make it bootable since after restarting the laptop and pressing the key, the other icon appeared. I was so excited to see the files being extracted and the progress bar moving as well. But, sad to say after that it just shows a black screen. The USB key is still on and has lights on it but it seems the screen on the laptop is not showing anything. Also it is warmer than normal. I hope that there is a site that could… Read more »
Just wanted to say thanks. This worked for the ESXi 6.5.0 U1 installer, on a Mac Pro 6,1. Saved me alot of hassle…
This worked great on my MacBook 12″. Thank you!
You rock! Thanks so much for the detailed instructions. Worked great on my 5,1 Mac Pro with ESXI 6.
Thanks for putting this together. I’ve done this on Windows many times but was fumbling around on my Mac until I pulled your post.
Awesome write up sir!
JR
ISOLINUX.CFG is in 10 different place when I open in TextEdit. How do I determine which one to change to SYSLINUX.CFG?
What was the process used to do this?
Has anybody tried this with OS X 10.11 (El Capitan)? I mark the partition as bootable (f 1) and it puts an * next to it but the * goes away when I “write”.
More specifically, going into fdisk seems to be the issue:
ian$ sudo fdisk -e /dev/disk3
fdisk: could not open MBR file /usr/standalone/i386/boot0: No such file or directory
Enter ‘help’ for information
fdisk: 1>
Nice Blog appreciate your efforts to contribute it work as a charm to me.
I also have not been able to get this to work, but I suspect that is because I am trying to get the USB drive bootable from a system with UEFI instead of BIOS. Do you know how to make it actually boot on a Mac Pro? It looks like the EFI boot stuff should be there, but I could not even get it to work by burning a CD image of the ISO.